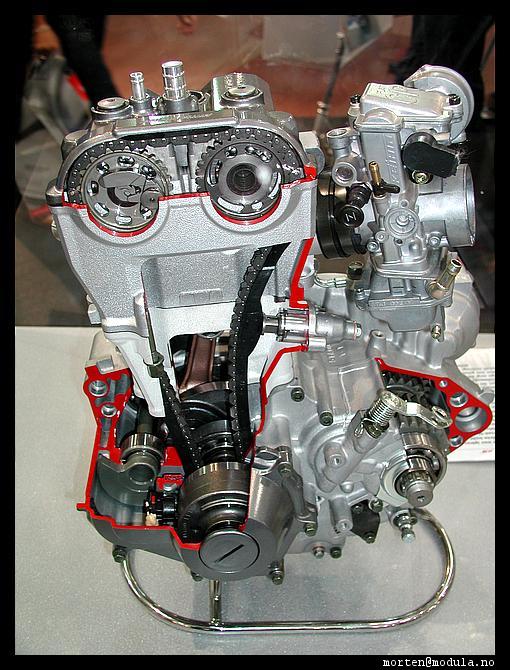

Trykk pċ bildene for stĝrre versjon.
 Informasjon om sykkelen fra yamaha-motor.com
Effekt: 37kW (52HK). I vognkortet stċr det 27,5kW, men det er visstnok feil.
Skiftet olje etter 10 mils kjĝring, da den hadde blitt gasset for mye mens den stod lagret og oljen var full av bensin. Pluggen ble ogsċ skiftet, da denne ble kortsluttet.
There's more to it than just going easy on it. The WR isn't setup from the factory in ready to ride form, IMHO. Also, you have to be "broke in" to the bike as well.
-Really, grease all the wheel bearings, linkage, swingarm, axles,headstay like Hick said. Get everything back together with a torque wrench, you'll be sooo happy you did this when your bike was new. They use almost no grease in all these critical areas.
- Oil the air filter. Mine was dry from the factory. This is VERY important.
-Set your suspension very softly and don't jump real high just yet. Leave them set softly for about 100 miles, then adjust from there. Your rear spring will sag during this time, so that's something else to check later.
-Change that oil as hick mentioned. It will be dirty with lot's of particles the first 150 or so miles.
- Tighten every third spoke until you've got them all (2 turns). Be careful, don't overtighten only 1/4 turns max each spoke at a time.
-Probably missing something here, obvious stuff like tire and coolant I guess
Ok now you can ride it...or maybe you can. The jetting is very lean as standard. You can probably get by at first by turning out the fuel screw to compensate for the lean factory pilot, but it's real common to change the jetting richer.
Do what the manual says, then ride it easy for about 60 miles or 4 rides, but don't chug it either. Don't let it idle very long, 2 minutes max. After 100 miles I think you're safe to rev it beyond 1/2 thottle, but this is an opinion. Some folks go longer, some much shorter as described in the manual. I'm anal and want my bike to last, so I errored on the conservative.
Now do all the free stuff--throttle stop, exhaust baffle, airbox lid and rejet (OK not free, but cheap anyway)
Now ride with wreckless abandon You'll love it!
Good luck!
LAY OUT A CLEAN AREA WITH CRAFT PAPER OR A WHITE TOWELL TO SET PARTS DOWN ON BEFORE YOU START, set all parts on the white towel or craft paper as you remove them! WORK CLEAN, WORK SMART
Remove plastics (tank, seat etc)
Remove upper motor plates (flat aluminum plates near top of head)
Remove breather hoses on top of valve cover (just let em hang down out of the way)
Remove the (2) plugs on the shifter side of the engine (crank and timing mark)
Remove the spark plug wire and plug
Remove the valve cover (2 allen bolts) be careful when removing the cover that you don?t screw up the valve cover gasket (if worried buy a new one from your dealership BEFORE you do this) mine came off really easy! you may have to move some wires out of the way to make it easier to get the cover off, just skootch em out of the way.
Rotate the crank (COUNTER CLOCKWISE) with 14 MM socket until the ?I? mark shows up in the smaller hole above the shifter
Look at the cam gears and verify that the timing marks are NOW SITTING at 9, 12 and 3 o clock on BOTH gears
CAREFULLY stuff LINT free rags down all openings around the cams, chain and spark plug hole area so crap wont fall in there.
Use a zip tie or piece of safety wire (or garbage bag tie wrap) to tie the cam chain to intake cam through the holes in the cam gear itself (this insures the chain wont slip off the crank gear.
Remove the cam chain tensioner by loosening the 2 bolts a little at a time in a criss cross pattern and take it out, once it is out remove the center bolt from the tensioner itself and use a small standard screwdriver to ?cock? the tensioner (screw the screw inside clockwise till the tensioner arm is pulled all the way back and locks into place) some people may like to cock the tensioner BEFORE they remove the tensioner form the bike, I did NOT do this.
Wipe the cam gears off really well with alcohol then using a SHARPIE or other permanent marker, mark the cam and the chain at the 12 O?clock marks on each cam (this is so you know where you are starting from, and can verify after you are finished)
Count the # of pins (the little round things that hold chain links together) BETWEEN the 12 o?clock marks on each cam, you will see there are 13 pins between each mark (this is standard WR timing)
Using a criss cross pattern loosen the cap bolts (8MM) for the EXHAUST CAM ONLY (the one closest to the front of the engine)
BE EXTREMELY CAREFUL NOW BE EXTREMELY CAREFUL NOW BE EXTREMELY CAREFUL NOW BE EXTREMELY CAREFUL NOW BE EXTREMELY CAREFUL NOW!
SLOWLY lift the cam cap off the cam and DO NOT TAKE YOUR EYES OFF THE CAM AREA there is a little (half moon) retaining clip in the cap and it just sits there waiting to fall inside the motor if you let it, but if you pay attention, and you have placed rags into all open areas on the top here, and you lift slowly it will come off with the cap and you can (grab) save it.
Now this is a bit tricky but its not hard...lift the exhaust cam up out of its cradle (chain and all) and move it toward the intake cam and forward a bit (toward you) you will have to finagle it around a bit to get the chain to come off, the idea is to rotate the exhaust cam 1 tooth CLOCKWISE, do it however you can WITHOUT gouging or damaging the bearing surface area of the cam or the cradle or the cam lobes themselves, like I said its tricky but not hard (yes there is a difference).
Once this step is complete let the cam sit back in its cradle and then count the pins between 12 o Clock marks on the cam gears (exhaust cam mark may now be closer to 1 o Clock) there should now be 12 of them (remember there were 13)
If you are satisfied the the new setup is correct, pour a capful of oil over the cam bearing surfaces and into the cam cradle area as well as the chain and gears,(NOT DOWN THE SPARK PLUG HOLE) carefully replace the 1/2 moon ring into the cam cap, smear some new oil on the bearing surface of the cam cap as well and replace the cap CAREFULLY, torque the cam cap bolts using the prescribed torque in the manual (under periodic valve adjustment).
Replace the cam tensioner (still cocked) and once installed loosen the screw that you cocked it with to un-spring the cam chain tensioner back into place, it will unwind itself really easy once you start to unscrew it, then replace the center bolt and crush washer.
Using a capful of NEW oil, again douche the top area and shim buckets, cam and chain with oil.
Use the 14 MM socket and SLOWLY rotate the engine COUNTER CLOCKWISE (from the crank bolt) and listen for ANY weird noises, (turn the stereo down if you have to) you are making sure the cam chain and cams are aligned and everything rotates freely and there are no binding noises or movements.
Replace the valve cover gasket into the cover and carefully put it back onto the cylinder head AFTER you have gone around with a clean rag to remove ANY and ALL gasket sealer that may have been left behind from the removal of the valve cover, PAY SPECIAL ATTENTION to the gasket so that is sits in the groove of the valve cover correctly, (NO new sealer was required on mine), if you screw this up the bike will leak oil, if you are careful the gasket will seat again and you will be fine!
Replace the rest of the bits and pieces in the reverse order you took them off and so long as you did NOT drop the clip from the cam cap down into the cases OR damage the bearing surfaces of the cam or head give yourself a BIG High Five! you just re timed your WR to YZ spec?s (at least as far as cam timing go?s).
I hope this method gives you the confidence to try this your self, you will be amazed at how easy it really is, and it will give you a great opportunity to understand a little further the inner workings of your machine, I had NO CLUE whatsoever how to do this to this bike before I just got a hair up my bottom one night and decided I was going to do it, I made it all happen and had the bike fired back up in less than an hour! YOU CAN TOO! Team Scream.